Stylesheet and Logo Customization in Promodag Reports v14
Make Your Reports Stand Out
TLDR: New customization features let you create on-brand, professional Exchange reports with custom stylesheets and company logos. Use the built-in Style Editor to modify colors, fonts, and layouts, then add your logo for consistent corporate identity.
With the release of Promodag Reports v14, Exchange administrators and business users can now create reports that not only deliver valuable insights but also look polished, professional, and on-brand. Two standout features—custom report stylesheets and logo integration—make it easier than ever to reinforce your company identity in every report you produce.
Why Styles and Logos Matter
Branding is more than just a logo; it’s the sum of colors, fonts, and layouts that represent your organization’s face to the world. When your reports follow your corporate style and proudly display your logo, you’re sending a clear message of professionalism and trust—whether your audience is internal management, external clients, or regulatory bodies. Consistent, branded reports are easier to read, carry greater authority, and help prevent confusion about document origin.
Customizing Your Reports: Step-by-Step
With Promodag Reports v14, customizing your reports with stylesheets and logos is straightforward. Here’s how you can get started:
1. Managing Stylesheets
Create or modify a stylesheet
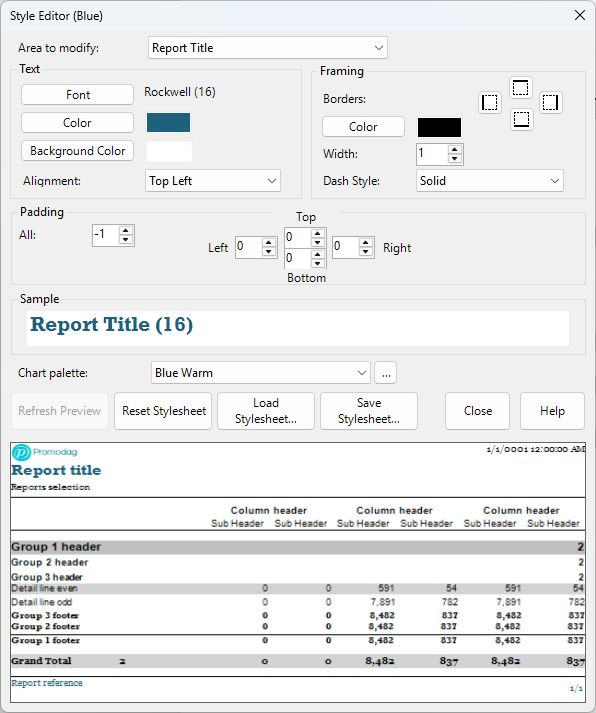
To create or modify a stylesheet, you must use the Style Editor that is available in the Tools menu.
You can load any of the 4 stylesheets delivered with the application or change the default style. The name of the style you are editing appears in the title of the window.
In the Style Editor window, locate the name of the report area whose style you want to change, and then select that area from the list of editable fields at the top. Once you have made your changes, go to the next area. At any time, you can use the Refresh Preview button to judge the results.
Once you are satisfied with the result, save the stylesheet under a new name. A sneak peak is visible in the preview area.
All you have to do now is to check the result by applying this stylesheet to your reports.
Use a default stylesheet for your reports
To apply the same style to all your reports you can use the Tools> Options menu. Now all your reports will use this style, unless you want to apply a particular one.

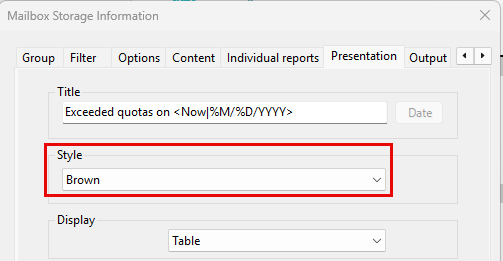
Use a particular style in specific reports
Even if you have chosen a default style for report options, it is still possible to use a particular style at report level. This requires choosing from the list of styles that is available in the Presentation tab of each report.
2. Adding Your Company Logo
You can also add your own logo to reports by loading it in the Reports tab of the Tools > Options menu. The supported formats are Png and Gif and the recommended size are 250x250 or 200x150 depending on the logo's shape.
Once you have done this, all generated reports will display your logo in the upper left-hand corner of the report.
The Benefits in Practice
By following these steps, your reports will immediately reflect your corporate identity, making them suitable for sharing with executives, clients, and auditors. A well-chosen stylesheet makes information easier to digest, while a visible logo lends authenticity and authority to every document.
Make the Most of Promodag Reports v14
The ability to quickly apply consistent branding to your reports is more than a cosmetic update—it’s a strategic advantage. With Promodag Reports v14’s user-friendly tools, you can ensure that your Exchange reporting not only informs but also impresses.
Ready to get started? Upgrade to Promodag Reports v14 and explore the new possibilities in report customization. For further assistance, consult our documentation or reach out to our support team —we’re happy to help you make your reports shine.
Comprehensive Exchange reporting made simple for Office 365, On-Premise, and Hybrid environments
Start your free 45-day trial of Promodag Reports