How to manually create a custom Promodag app in your Office 365 tenant
Promodag Reports v.14 now uses certificate-based authentication instead of the old user-based authentication method (see this blog post). This requires that an application with the necessary permissions be created in Azure and that you allow this application to interact with your Office 365 tenant.
For your convenience, Promodag provides a PowerShell script to automatically create this Promodag Reports Application that you can authorize to access your tenant along with the corresponding certificate. However, it is possible that your company's security policy requires you to create a custom application and certificate yourself.
Step 1: Generate and export a self-signed certificate with PowerShell
The first step is to generate a self-signed x.509 certificate which will serve as an authentication between your application and Promodag Reports.
Open an elevated (run as administrator) Windows PowerShell session to create a self-signed certificate and export it to .cer and .pfx formats.
For example, here is how to create a self-signed certificate with the name “Promodag Reports App” with a validity period of two years from now and P@ssw0rd1234 as password. The certificate will be stored in the personal store of the currently logged user.
$mycert = New-SelfSignedCertificate -CertStoreLocation "cert:\CurrentUser\My" -NotAfter (Get-Date).AddYears(2) -KeySpec KeyExchange -Subject "Promodag Reports Application"
Once created, export the certificate under a pfx format with the password P@ssw0Rd1234. The pfx certificate will be used by Promodag reports as well as the password.
$mycert | Export-PfxCertificate -FilePath promodagReports.pfx -Password $(ConvertTo-SecureString -String "P@ssw0Rd1234" -AsPlainText -Force)
Then export to a cer certificate file that will be used by your Azure application.
$mycert | Export-Certificate -FilePath promodagReports.cer
Step 2: Register a custom Promodag Reports application in Azure AD
1. Open the Azure AD portal at https://portal.azure.com/.
2. Under Manage Azure Active Directory, click View.
3. On the Overview page that opens, under Manage, select App registrations.
4. On the App registrations page that opens, click New registration.
5. On the Register an application page that opens, configure the following settings:
a. Name: Enter something descriptive. For example, Promodag Reports Custom.
b. Supported account types: Verify that Accounts in this organizational directory only (<YourOrganizationName> only - Single tenant) is selected.
When you're finished, click Register.
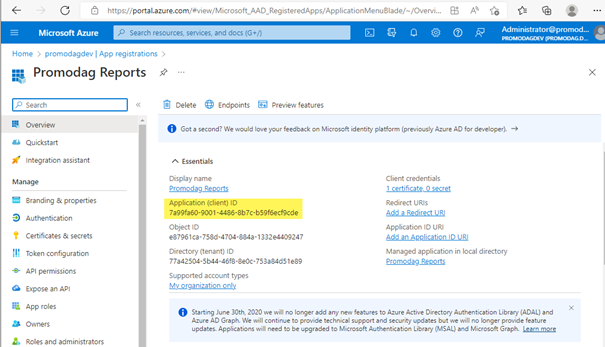
6. Copy the application ID into Notepad as you will need this information at the end of the procedure.
7. Leave the app page open. You'll use it in the next step.
Step 3: Assign the appropriate permissions to the application
1. On the app page under Manage, select Manifest.
2. On the Manifest page that opens, find the requiredResourceAccess entry (on or about line 47).
3. Modify the resourceAppId, resourceAccess, id, and type values as shown in the following code snippet without forgetting the ], at the end:
"requiredResourceAccess": [
{
"resourceAppId": "00000003-0000-0ff1-ce00-000000000000",
"resourceAccess": [
{
"id": "20d37865-089c-4dee-8c41-6967602d4ac8",
"type": "Role"
}
]
},
{
"resourceAppId": "00000002-0000-0ff1-ce00-000000000000",
"resourceAccess": [
{
"id": "dc890d15-9560-4a4c-9b7f-a736ec74ec40",
"type": "Role"
},
{
"id": "dc50a0fb-09a3-484d-be87-e023b12c6440",
"type": "Role"
}
]
},
{
"resourceAppId": "00000003-0000-0000-c000-000000000000",
"resourceAccess": [
{
"id": "df021288-bdef-4463-88db-98f22de89214",
"type": "Role"
}
]
}
],
When you're finished, click Save.
Step 4: Approve the application in the Office 365 tenant
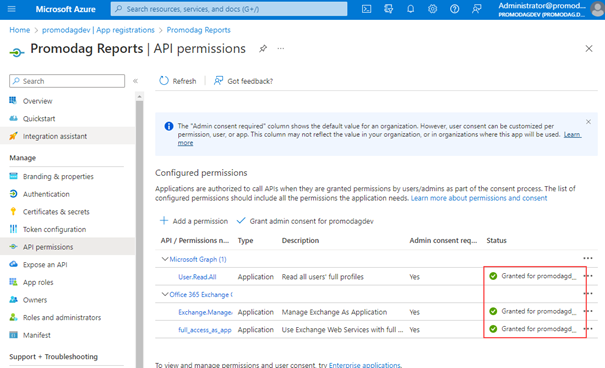
1. Still on the Manifest page, under Manage, select API permissions.
2. On the API permissions page that opens, do the following steps:
- API/permission name: Verify the following values are shown.
- Microsoft Graph : User.Read.All
- Office 365 Exchange Online : Exchange.ManageAsApp and full_access_as_app.
- SharePoint: Sites.Selected.
- Status column: The current incorrect value is Not granted for <Organization>, and this value needs to be changed.
Select Grant admin consent for <Organization>, read the confirmation dialog that opens, and then click Yes.
The value of the Status column should now be Granted for <Organization>.
Step 5: Import the certificate created in step 1
- On the application page, under Manage, select Certificates & secrets.
- On the Certificates & secrets page that opens, open the Certificates tab and click Upload certificate.
- In the dialog that opens, browse to the self-signed certificate (.cer file) that you created in Step 1 and click Add.
Your application is now created.
Step 6: Assign the required roles to the application
To assign the required role to this custom application, refer to the common procedure: How to assign the Global Reader role to the Promodag app in Azure AD
Step 7: Define the custom application in Promodag Reports
- Start Promodag Reports and go to Tools > Options.
- Open the Office 365 Configuration tab.
- In the Application ID field, paste the application ID that you pasted into Notepad in step 2.
- In the Certificate file field, enter the path to the .pfx certificate you created in step 1.
- In the Certificate password field, paste the password for this certificate.
- Click OK to return to the Office 365 Configuration tab.
- Click the Check PowerShell connection and Check EWS connection links to validate your settings.
Try Promodag Reports Free for 45 Days